

Medically reviewed by Dr. Chettasak Tulyapanich (formerly Dr. Chettawut) – Plastic and Reconstructive Surgeon, WIH International Hospital

Vaginal Dilation After Gender Affirming Surgery
The Complete Guide
Does this guide apply to you?
This page applies if you had skin graft, colon, or PPV vaginoplasty — the three techniques that create a full-depth neovaginal canal. If you had Zero-depth vaginoplasty or Orchidectomy without Vaginoplasty, dilation is not part of your recovery, since no vaginal canal was created — please visit your procedure page for your specific aftercare guidance instead.
Quick answer
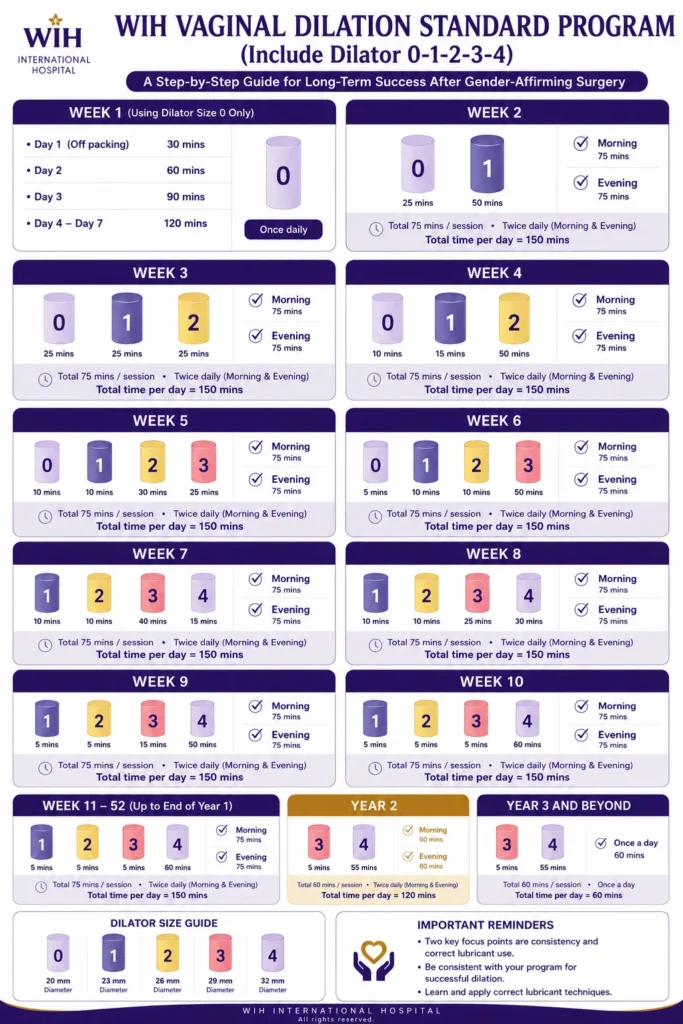
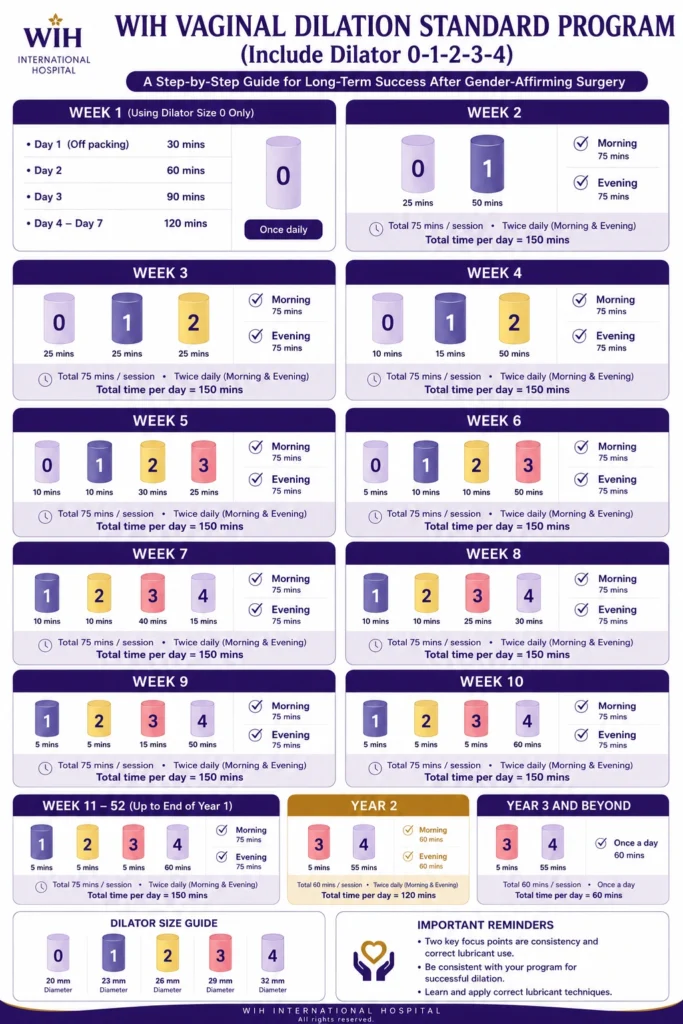
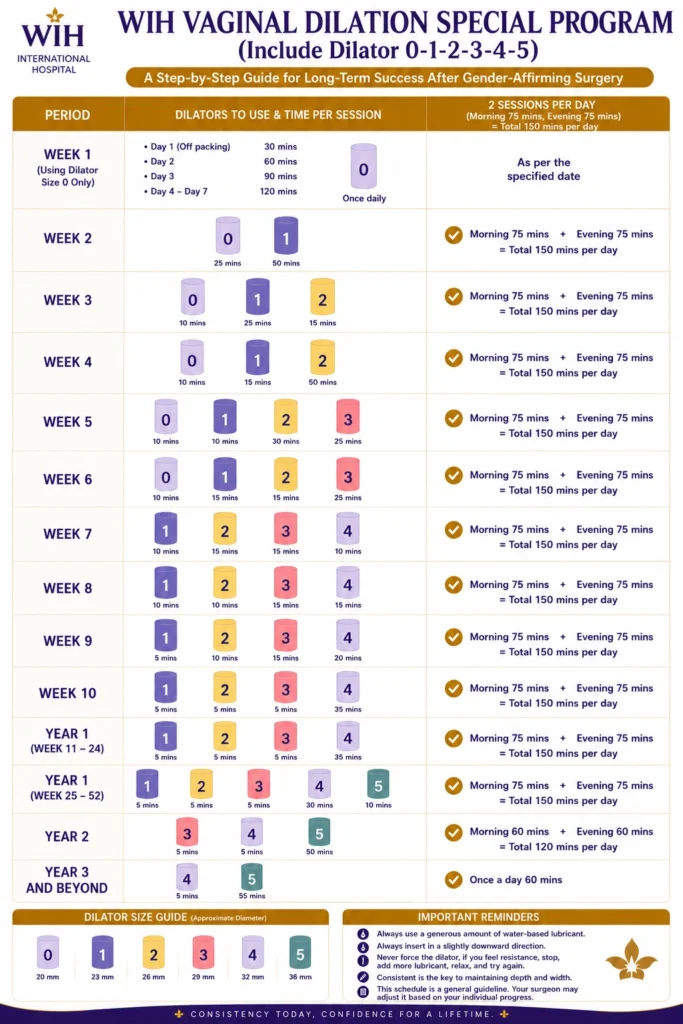
Vaginal dilation should begin as soon as your vaginal packing is removed and continue long-term: twice a day in year one (about 75 minutes per session) and year two (about 60 minutes per session), tapering to once a day (30–60 minutes) in year three, and easing further to about 1–2 times a week (15–30 minutes) beyond year three, adjusted individually with your care team.
The goal is to maintain the depth achieved at surgery — not to keep growing it — while progressing width up to dilator Size 4. Use generous water-based lubricant during dilation; if you had colon vaginoplasty, added lubricant is typically no longer needed once natural lubrication is established, usually after about a year. Dilation is not optional — it takes daily discipline, because depth lost from missed sessions cannot be recovered.
Why Vaginal Dilation Matters
Vaginal dilation is one of the most important parts of recovery after gender-affirming surgery (GAS). Without it, the neovagina will naturally shrink over time — losing both depth and width. This isn’t a risk you manage passively: daily dilation for the first two to three years is what protects your surgical result, and depth that’s lost from missed sessions cannot be regained. Consistency is a discipline, not an option.
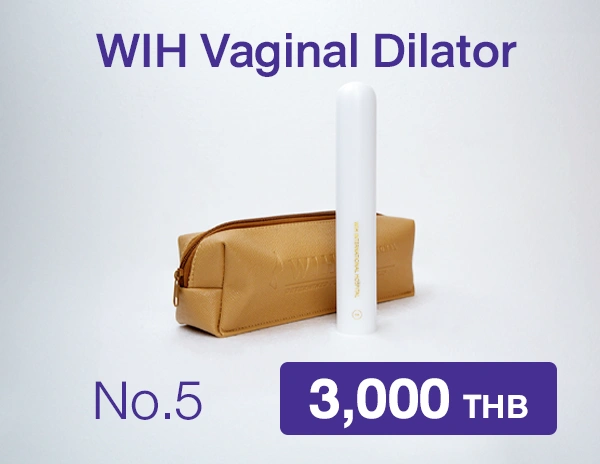
For patients who feel comfortable with Size 4 and wish to continue expansion, an optional Size 5 dilator (35 mm) is available for purchase. However, sizes larger than Size 4 are generally not necessary for maintaining neovaginal health unless specifically recommended.
Why We Build to 6–7 Inches, Not Less
A surgically constructed neovagina — especially one made with a skin graft — doesn’t stretch the way natural vaginal tissue does. Its deepest point can’t expand significantly under pressure, whether from penetration or from a dilator. In practical terms: the depth created at surgery is close to the maximum depth you will ever have.
Two things make this matter:
- Limited elasticity. Because the deepest tissue doesn’t expand later, a neovagina built to less than 4 inches may not function well for penetrative intercourse — there’s little room to compensate.
- Skin graft contraction. Grafted tissue can naturally shrink over time. A neovagina built to 6–7 inches can lose an inch or so to contraction and remain fully functional; one built to only 4 inches has no margin to lose.
This is exactly why consistent dilation matters: it’s what counteracts this natural contraction and protects the depth your surgery achieved.
- Maintaining depth: Inserting the dilator to the depth achieved at your surgery and holding steady pressure is what prevents the canal from narrowing. The target is to maintain that original depth, not to keep expanding it.
- Maintaining width: Progressing gradually to larger dilator sizes — similar to stretching an ear piercing — keeps the tissue flexible and functional.
At WIH Hospital, patient education and postoperative support are central to good outcomes. Proper dilation technique is just as important as the surgery itself.
Watch: How to Perform
Vaginal Dilation
Dr. Chettasak walks through the correct technique step by step in this video.
Real-patient demonstration video
Goal:
Most patients aim to progress to Size 4, which is wide and flexible enough for typical sexual activity — statistically, 95% of male partners have a size equal to or smaller than Size 4’s width.
Reaching Size 4 comfortably is also generally when patients are ready to resume sexual activity — typically around 3 months after surgery at the earliest.
For most patients, sizes beyond Size 4 aren’t necessary.
⚠ Important: this schedule is counted from the day your vaginal packing is removed — “Day 1” is packing-removal day, not your surgery date. When packing comes out depends on your technique:
Step-by-Step Dilation Technique
1. Get Ready and Into Position
Before you begin, gather your WIH dilator set, water-based lubricant, a small mirror, medical gloves, a bed pad or protective sheet, and tissues or baby wipes — having everything within reach lets the session flow smoothly without interruption.
Then lie down in a comfortable semi-reclined position, similar to reading in bed, and bend both knees, letting your legs relax apart.
For the first three months after surgery, don’t open your legs more than about 60 degrees, since opening wider than this can place unnecessary tension on your healing incision.
2. Lubricate with Your Finger — The Single Most Important Step
Generous lubrication protects the vaginal entrance, the internal walls, and the urethra from friction. Never rush this step.
Put on a glove. Squeeze a generous amount of water-based lubricant at the vaginal opening, then use your index finger to:
- Spread lubricant all around the opening first
- Scoop more lubricant on your finger and gently push it into the canal as far as your finger comfortably reaches
- Move your finger side to side to distribute the gel evenly along the walls, inserting to about your first knuckle (roughly 2–3 inches)
This coats and protects the junction between the vaginal opening and the new vaginal lining — one of the most sensitive areas during healing. As you do this, you’re also confirming the correct angle: the canal tilts slightly downward, away from the urethra above it. Never push upward toward the urethra.
3. Choose and Prepare Your Dilator
Always start with the smallest dilator appropriate for your current stage of the schedule (typically Size 0 or Size 1). Clean it thoroughly with mild soap and warm water before every use, then rinse well. Apply a small amount of lubricant to the dilator itself — but remember, most of your lubrication should already be inside the canal, not on the dilator.
4. Insert the Dilator
Use a mirror, especially in the first few months, so you can clearly see the vaginal opening. Align the tip of the dilator with the opening and begin inserting it gently in the same downward direction you identified in Step 2.
If you feel resistance, don’t force it — pause, add more lubricant, relax, and try again. You should feel gentle pressure, not sharp pain.
5. Advance to Full Depth
Once the dilator has passed the entrance, you can gently rotate it left and right — clockwise or counterclockwise — as you ease it deeper, if this helps you advance; it’s an optional aid, not a required motion.
Straightening your legs slightly at this point can also help relax the surrounding muscles and make deeper insertion more comfortable.
Aim to reach the full depth of your own vaginal canal — matching the baseline depth established at your surgery and confirmed during training, often around 6–7 inches, though this varies by patient. The goal each session is to hit your depth, not a generic number.
Once you reach the deepest point, stop rotating. From here, switch to holding the dilator with steady, appropriate, even pressure instead (see Step 6) — no more rotation once you’re at full depth.
Consistently reaching your full depth is what prevents the canal from shortening over time, and once depth is lost, it cannot be regained.
6. Hold with Steady Pressure
Once the dilator reaches its deepest point, actively hold it in place with gentle, steady pressure rather than just letting it rest — don’t let it slide back out. Hold for your recommended session time. Breathe slowly and deeply throughout; tension is the enemy of dilation, relaxation is everything.
7. Remove Slowly
When your session time is complete, remove the dilator slowly and gently. There’s no need to hurry.
8. Progressing to a Larger Size
When you move up to the next dilator size, apply fresh lubricant every time — both to the new dilator and around the vaginal opening. It’s completely normal for a larger size not to reach full depth right away. Don’t force it; increase the depth a little each day.
Some people need several days before a larger dilator reaches the same depth as the smaller one — that’s normal, and your body will gradually adapt.
3 Keys to Successful Vaginal Dilation
- Don’t rush, don’t tense up, don’t force it.
- Stay relaxed.
Take slow, deep breaths and focus on what you’re doing. - Be consistent.
With regular practice, dilation becomes easier, more comfortable, and eventually just part of your daily routine.
One protocol for every depth-creating technique
Skin graft vaginoplasty, colon vaginoplasty, and PPV vaginoplasty all follow this identical dilation schedule — there’s only one routine to learn, no matter which of these three techniques you had.
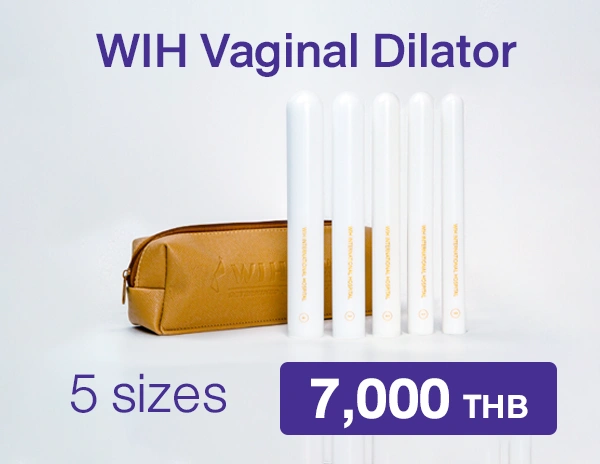
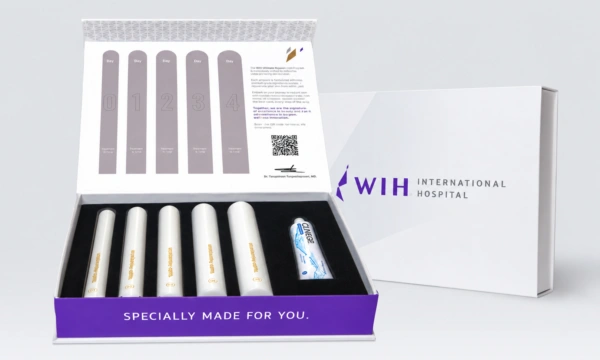
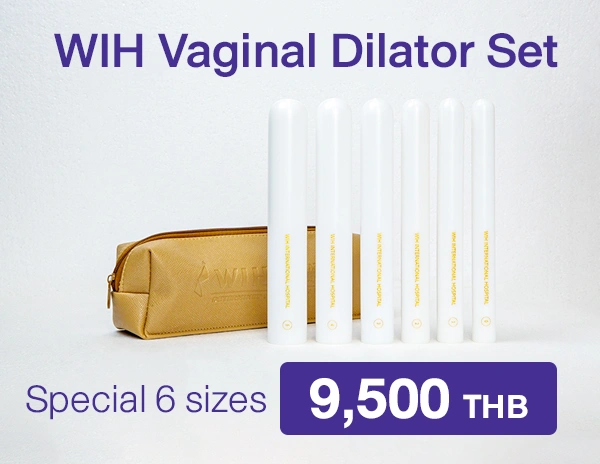
WIH Vaginal Dilator Set
Each dilator is 8.5 inches (about 21.5 cm) long, and the set steps up gradually in width:
Size 0 (20 mm) is a very small starter size for easy, painless insertion;
Sizes 1 through 3 (23 mm, 26 mm, 29 mm) gradually widen the canal;
Size 4 (32 mm) is the target size for most patients, increasing by 3 mm at each step so the jump between sizes never feels too big.
Your Vaginal Dilator set
— Sizes 0 through 4 — is provided free with your vaginoplasty package, along with the lubricant you’ll need for your first few weeks of dilation after your packing is removed.
Size 5 (35 mm) — optional:
Size 5 isn’t part of the standard free set. It’s available to purchase separately for patients who want to expand capacity further — for example, to more comfortably accommodate a partner on the larger end of the range.
We recommend waiting until at least 6 months after surgery, and only once Size 4 already feels easy and comfortable, before introducing Size 5
Standard Size Dilator 0-4
Tip if dilation feels too intense:
If two 75-minute sessions a day feel like too much — especially if you’re experiencing tightness — you can split your daily routine into three 50-minute sessions instead.
Total daily time stays about the same; it’s simply a more comfortable way to reach it.
Frequently Asked Questions
How long does dilation last after surgery?
The twice-daily routine continues through year one and year two. By year three, most patients can reduce to once daily, with sessions of about 30–60 minutes. Beyond year three, the routine becomes more individualized — many patients settle into roughly 1–2 sessions per week, 15–30 minutes each. Lubricant needs may also change over time — see the lubricant guide.
What if I miss a dilation session?
You can make up the time later the same day. Consistency over time matters more than perfection in any single session.
What if I have a long flight and can't dilate on my normal schedule?
Before a long flight, extend your session to about 120 minutes (instead of your usual 75) to bank extra time. Resume your normal schedule as soon as you arrive at your destination.
Is it painful to use bigger dilators?
Some discomfort is normal at first, and it’s okay if a larger dilator doesn’t reach full depth right away. Never force it — increase depth gradually over several days.
Can I rotate the dilator while inserting it?
Yes — gently rotating it clockwise or counterclockwise as you advance can help if it makes insertion easier, though it’s optional. Once you reach your full depth, stop rotating and switch to steady, even pressure instead.
Why can't I open my legs more than 60 degrees in the first three months?
Especially during the first month after surgery, too much tension on the healing incision can cause the wound edges to separate. When this happens during dilation, it’s usually from one of two things: not using enough lubricant at the vaginal opening, or opening your legs too wide, which pulls on the wound edges. This most commonly affects the vaginal opening itself or the lower part of the outer labia. Staying within about 60 degrees — combined with generous lubrication — helps keep tension off these healing areas while they recover.
Can I use a dildo instead of a medical dilator?
No. Dildos and sex toys are designed for pleasure, not postoperative maintenance, and don’t replace a medical-grade dilator in your structured recovery program.
Can I use scented or colored lubricant?
No. Dildos and sex toys are designed for pleasure, not postoperative maintenance, and don’t replace a medical-grade dilator in your structured recovery program.
Where should I put the lubricant — on the dilator or inside the canal?
Focus on the canal, not the dilator. Roughly 80% of the lubricant should go directly into the vaginal entrance and canal, with only a small amount on the dilator itself, since medical-grade dilator surfaces are already smooth. For sexual activity, lubricate both partners, but prioritize the neovaginal entrance and canal, since that tissue carries the greater risk of friction injury.
When can I resume sexual activity after surgery?
Most patients can resume sexual activity starting around 3 months after surgery, once they’re comfortable using dilator Size 4. Reaching Size 4 comfortably means your neovagina has the width and flexibility to accommodate typical intercourse.
Does having sex count as a dilation session?
Yes — one act of penetrative intercourse counts as one dilation session, since it provides similar stretching. That said, you can’t stop dilating altogether: if you’re on a twice-daily schedule, sex can take the place of one session that day, but you should still complete your other scheduled session. Before sex, it’s a good idea to warm up with a partial dilation session (about 15–30 minutes) first — this helps distribute lubricant evenly inside the canal.
Does my dilation schedule start from surgery day or from packing removal?
It starts from packing removal, not surgery. Colon vaginoplasty patients typically have packing removed around day 5, while skin graft and PPV patients are typically around day 7 — so your personal “Day 1” will fall on a different calendar date depending on your technique, but the schedule itself is identical for everyone.
Dilation Schedule: What to Expect
Training begins the day your vaginal gauze packing is removed. WIH’s nursing team demonstrates the full process at no additional cost, daily, until you’re confident doing it independently — this session also sets your baseline depth, which every future session should match.
Lubricant Guide for Dilation and Sexual Activity
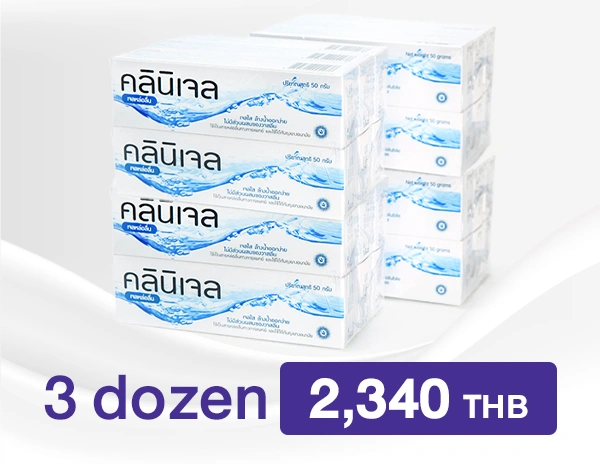
Following GAS, two things matter most for neovaginal health: consistent dilation, and using lubricant correctly. Why generous lubricant is worth it: A natural vagina that gets irritated or micro-injured can simply rest and heal. A neovagina doesn’t have that option — dilation has to continue daily regardless. Using plenty of lubricant every session isn’t excessive; it’s a deliberate investment to prevent injuries that would otherwise force you to keep dilating through an already-injured canal, with no way to pause and recover.
Technique: Apply lubricant at the opening, then use a clean finger to gently push or scoop it inward — repeating this a few times helps it flow deeper. Move your finger side to side to distribute it evenly, inserting to about your first knuckle (roughly 2–3 inches).
This also helps you learn the entrance, depth, and the slight downward angle of your own anatomy — understanding this angle matters, since inserting a dilator at the wrong angle can put pressure on the urethra or injure the opening. Especially in the first six months, don’t be afraid to use plenty of lubricant — more lubricant makes dilation easier and safer.
Always use a water-based lubricant for dilation and intercourse. It reduces friction — the leading cause of small tears, soreness, or bleeding from granulation tissue — and is easy to clean without leaving residue. Silicone-based, oil-based, and colored or scented lubricants are not recommended — each carries its own risk of residue, irritation, or damage to your dilator.
Read our full lubricant guide for the reasons behind each one.
Water-based lubricant also helps keep the canal clean. Because it dissolves in the vaginal environment rather than sitting on the surface, dilation with water-based lubricant naturally helps carry discharge out of the canal each session — a kind of built-in self-cleaning. This is one more reason most patients don’t need to douche: modern gynecology generally advises against routine douching, since it disrupts the vagina’s natural pH balance, and your daily dilation routine is already doing that cleaning work for you
Note for colon vaginoplasty patients:
The colon segment produces its own natural mucus, so added lubricant typically isn’t necessary once this natural lubrication is established — usually around one year after surgery. Patients who had skin graft or peritoneal (PPV) vaginoplasty should continue using lubricant for dilation and intercourse long-term, since these techniques don’t produce natural lubrication.
Ongoing Support at WIH Hospital
Dr. Chettasak designed WIH’s Long Stay Recovery Ward around patient safety: most patients stay at the hospital for about 30 days after surgery — real time to learn proper dilation technique directly from our nursing team, not just a rushed day or two. During your stay, your wound is monitored closely, and Dr. Chettasak’s team can step in immediately if anything needs attention. If you have questions or run into problems during recovery, contact Dr. Chettasak’s team any time.

Book your consultation
Ready to learn more, or need support with your dilation routine? Contact Dr. Chettasak’s team at WIH International Hospital.